Wednesday, November 18, 2015

I'm finally back to posting, here is what I did for the Yew Dell sculpture show...

I have had an idea about doing a predator and prey sculpture for some time, years in fact.  In the right block would be a big cat, in the left block a hooved animal evading capture.  The sculptures would be emerging with stone supporting the more fragile areas - legs, tail, etc.

This is my original model for the sculpture - it is a cheetah - the front leg fell off the model, but I know generally where it is.  I use the model to start the profile of the big cat.

I begin by cutting the profile then carving around the head.

after the head comes the front leg and paw.

I determine the other front leg of the cat roughly (just barely carving into the stone) being careful to stay off the final form of the leg until I am sure of what I want.  I hold a wax model of the fleeing deer (this is called sight sizing) against the stone to see how it will fit.  This sculpture was originally going to be a cheetah and gazelle as there are so many videos of cheetahs pursuing prey, but I reconsidered mid carve and changed it to a cougar and young deer.

The deer is partially carved, I start by cutting down to the profile then working out where everything (legs, tail, etc.) is.


This is Leda and the swan another sculpture for the Yew Dell show.  I started this piece with a sketch directly on the stone. Leda looks down at the swan (Zeus in disguise) her hair cascades down at her side and splits across the swans back.  This alludes to their union which results in the twins Helen and Polydeuces.


First I cut the lines in with a four inch angle grinder...

I also use the grinder to shape the form...

I work from the top down beginning the neck of the swan.

A die grinder is used to define clothing and the profile of the face.  These photos are from a partial time lapse on youtube -
https://www.youtube.com/watch?v=W7Z2WyF6w6k

I also have some real time videos of predator and prey on youtube here -

https://www.youtube.com/results?search_query=possmom8

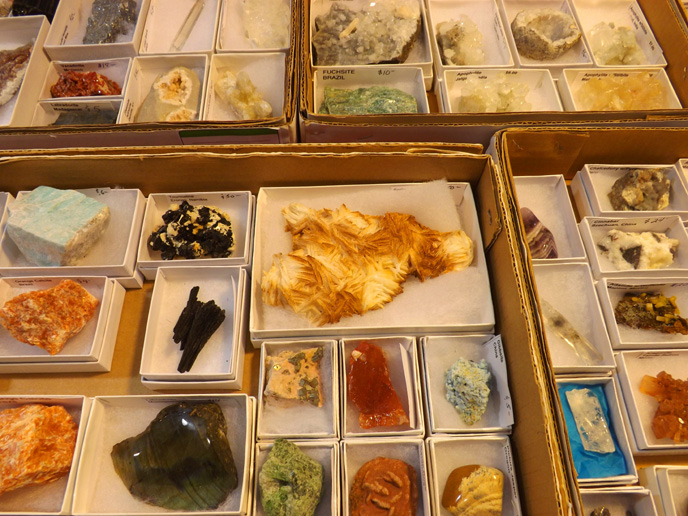
KYANA Geological Society will have its annual show this weekend - the photo above shows a small sample of the crystal samples that will be for sale.  Also fossils and hand made jewelry will be available. The show is at Camp Crestwood, 7206 Clore Lane, Crestwood, KY
Here is a link with more info -
http://kyanageo.org/showflier.htm

Sunday, May 3, 2015

Finishing the Lion and nature pics

I am coming to the finish on the Lion.  I have gone over the stone around the Lion smoothing out the tool marks from the grinder.  I don't plan to sand those areas I want that to have a bit rougher surface.  On the Lion I have been going over the entire cat refining areas, cleaning up rough spots, etc.

I decided I didn't quite like the hip area and have re-carved that area, the tail had a couple of areas I wasn't happy with and I worked that out as well.  Now I just have to sand out and refine what I have done.
At the beginning of a sculpture you cut a lot and look, at the finish you look a lot and then carve.  I look at it as the sun goes across it seeing if there are weak areas I need to address.

I have been smoothing out the grinder marks on the ledge over the Lions head - there is still more to go, though.

Rain water was running down the back of the stone as I intended but it was also running around the side.  I have cut slots in the stone to direct the water away from the Lion.  The dust from the top of the sculpture runs down with the rain and helps me to judge how this drainage design is working.  It seems to be working pretty well.

I have cut in the eyes and teeth though a little refinement on the canines is still needed.  I'm really happy with how it looks.

These are balls of dust formed by the wind.

Pretty deer.

There was a lot of rain this spring, I photographed this after a downpour, the white is stone dust.

Sunset in Yellowbank.

Sunday, April 19, 2015

Cutting the bottom of marble block, the second stone of Predator and Prey, finish work on the American Lion and Nature photos

After splitting off a section of stone from the bottom of this piece, I cut the bottom flat with an angle grinder.  I use a hammer to tap off sections as I go.

Almost there, just a little bit at the corner.

The other stone for the Predator and Prey sculpture is moved in.  There will be a young deer leaping away, I'm working on the model for it. Nothing to see yet.

I use a diamond burr on the die grinder to cut in the small lower teeth of the American Lion.  The burr flares out at the end which is better for cutting in between teeth.  I can't get to close to the lips - it will cut a "v" into the lip.  I will use a diamond point where the teeth and lips meet.

The burr I used for the teeth I also use around the eye.

I need to soften the lips - lots of edges there that don't belong on a lion - also need to refine and finish the nose.

The canine teeth are too wide and need to come to more of a point....

I am making a way for rainwater to drain from the top of the piece but not run around the side to the front leg of the Lion.

I have sloped the top toward the center of the block and toward the back so rainwater won't run over the carved area of the sculpture.

Here is tiny snapping turtle that was out in the road, so I crossed it.

Ants on a potato chip.

Evening sun on trees.

more evening sun...

Blue eyed Mary wildflowers blooming in Yellowbank WMA.  Here is a video of them -
https://www.youtube.com/watch?v=5VCkHDKg3lk

Tuesday, April 7, 2015

"Tweaking" the Lions face, a finished Vet sculpture,more kid work, split marble and which side is real and which is the reflection?

There were symmetry problems with the lions eyes - the one on the right side (lions left) was too wide so I marked in crayon where it needed to come in, also the brow needed some stone removed as well.  I marked all these in black china marker.  A small arrow shows where the ridge running up the middle of the nose should be - the ridge line is what I measured off of and it was off center. Also, the area between the inside of the eye and brow of the problem eye is not as deep as the other eye.

I have worked on the eye and gotten it pretty close to where it needs to be.  I will go on to work on other areas before I finish the details of the eye.

I have carved out behind the canine (feline?) tooth with a die grinder.  I check my photo reference of tigers and lions snarling and I realize upper lip just over the teeth is too full and needs to be carved back.


I have also added some furriness just in front of the ears, this is more in keeping with a tiger than a lion.

After I was sure the eyes were just right I could then begin to establish exactly where the teeth are, while the eyes are easy to move around (you can always set them a bit further back) once you have cut around a tooth, that's it, there no way to change it.  I have crayoned the individual teeth but will be looking at reference and looking at the sculpture to be sure how to cut in those big teeth.

 A little refining of the front leg with a sander...

The face is better, probably a bit more off the lower part of the upper lip... At this stage of the sculpture I spend much more time looking than carving.

This is a portrait sculpture for a local veterinarian.  He is looking at a puppy while it's anxious but trusting mother watches.

This is kind of horrible looking, it is the hand of the Kid I have been working on (it is in Castilene and will be cast in bronze). The left forearm was too long so I cut it off and stuck the hand back on by warming some more Castilene.

The kids face was also too wide on this side - I have taken the ear off and will take off about 1/8" of clay - if you look closely there is a tiny little line..... also I use a 3m 180 sanding sponge to smooth the face on the right side of the photo nearest the light.  I used a heat gun to warm the clay and then warm the sponge.  I will post better photos later.

I drilled and split a piece of marble I will carve into a sculpture of a little girl.  I first drilled holes with a bulldog drill (3/8" bit) then I used the hammer drill with a 3/4" bit then a 1" bit for the large holes. The reason I stepped up so many times is that the hammer drill doesn't have a clutch and if it binds in the hole at all it can twist out of your hands and whack you in the arms.  By slowly enlarging the holes in steps it didn't bind much at all - no bruises!

The stone broke fairly clean, it ran out a bit it went the best direction away from the sculpture.  I lost a bit of stone from the section I removed but there is enough there for some small sculpture.

This is a photo of the flood waters around a farm house , but the photo is turned on its side - can you tell which is the reflection?

Wednesday, March 18, 2015

tweaking the lion, more conversation girl, the dancer and lots of rain


I have marked in crayon the areas that need additional definition.  The foot is too flat, I will use a pistol grip sander to take down the stone along the outside and inside, working the sander on edge this will give me a smooth, rounded depression on the outside and inside of the foot and the definition I want.

I have worked the shoulder and leg defining the area around the joint of the leg. I used a grinder to define the shoulder muscle then went back with a pistol grip sander to soften and smooth out the marks left by the grinder.

I have worked out the front foot of the lion and am cutting back some places on the rear leg of the lion I felt were too full.

I realized the lions left eye was just a bit too wide so..

I crayoned in the areas I felt needed work, but just to be sure, I put the photo in adobe photoshop to check changes I need to make, the eye is moved over a little bit, ear trimmed, muzzle thinned a bit, I just realized I didn't clone out the ruff, ah well....

I have been working on Conversation cutting down the hair and the arm...


There has been a lot of rain lately, this is what happens when you cut wet stone, the dust clumps all over it...

I check this water clay piece periodically to make sure he is drying okay.

There has been a lot of rain, which combined with the melting snow has meant flooding.  This is a view of the lower field in front of the house.

This is a house just down the road - that's the Ohio river behind the house.

A hawk

A tree at sunset.