Showing posts with label terre haute sculpture commission. Show all posts

Wednesday, September 22, 2010

Summer's End

Tomorrow is the official equinox, and the start of the fall season.I am appyling hair texture to the Grizzly Bear stone sculpture . As I apply a finish to a sculpture, it helps me to see areas that are still high. The mother's left side is high, and I am shaving it down with a diamond wheel on a 4" grinder.

Here, I am working on the mother bear's left side - I have shaved off the area that was too high on her hip and leg and am working around towards the cub. The shoulder area is heavy, I have crayoned in the area that needs to be removed.

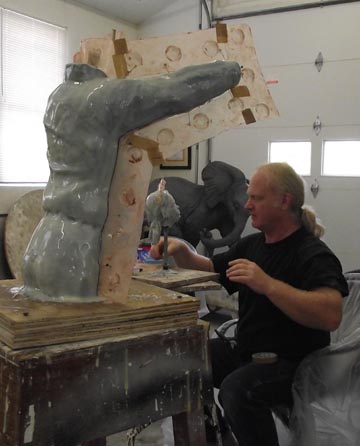
Meanwhile, Don was involved with 'crating and freighting' the molds for the Terre Haute commission. The first step, which involved my help, was duct taping the molds together.

Don built the crate, using a standard pallet as the base. He uses 2x4 braces with a 3/4" plywood skin. He is installing a deck mid-way up the box, so that the molds aren't lying on top of each other.

He gathered a pick-up load of carpet padding scraps from Fashion Floors of Brandenburg, and wrapped up the plaster and rubber molds. It's a long, bumpy ride to Art Castings in Loveland, Colorado.

Last night, we received the freight truck from R&L Trucking. The loaded crate is on our crane truck - rigged up and ready to go.

It was a happy moment to see the crate of molds, safely loaded and on their way to the foundry.

Yellowbank Creek wraps around our home property, and as I walked the banks, I spotted this carp feeding up in the shallows.

As soon as he saw me...SPLASH!!!...and he (or was it a she) was gone.

Tuesday, August 17, 2010

mold work on the Terre Haute commission

This is my 100th blog posting! The clay work for the Terre Haute family group was approved. The next step is to make molds of the sculpture and send them to the foundry, to become bronze.

The sculpture must be cut into pieces, to make it manageable for making molds and pieces that the foundry can pour at one time. We removed the heads first, using a wire tool.

Next, we used a sawzall to cut off the arms, which were then mounted upright onto waiting boards with pins. It is intensely nerve racking to cut up a sculpture that I've worked on for months.

Then, the children were cut up and removed, leaving the two adult torsos and legs. When everything was cut into handleable sizes, there were 17 separate pieces to be molded.

The mold work was turned over to Don and our neighbor, Steve McMillen. Steve helped Don on the Home of the Innocents sculpture groups last year. Steve is mixing the 2 part rubber Polygel 40 that we buy from Polytek. Even though we bought the mold compound in 5 gallon buckets, they pour the compound into separate quart cans, to keep down spillage. Notice the plastic sheet - mold making is messy, no matter how careful you are.

The first coat is the most important, as that picks up the surface details. You have to make sure that the rubber compound is pushed into every crevice, and that there are no bubbles.

After the first coat becomes hard, but still tacky, they apply a second coat. When it has gone off, but still tacky, thet apply the part-line shims. They use bubble sheet from sculpture depot in Loveland, Colorado. The sheet is cut into long strips, and those strips get smeared with trewax. Don is cutting the bubble sheet to follow the contour of the sculpture. He makes cuts where the curves are too sharp for the strips and tapes the pieces together with a special tape that we get from sculpture depot. The strips are attached to the sculpture temporarily with straight pins, right through the rubber coat and into the clay.

"...there's no place like home..."

They mix up a regular batch of rubber (equal volumes of part A and part B), and then mix in this light fluffy stuff called Polyfil 2 that we get from Polytek. It makes the rubber compoung stiff, like cake icing. They put it into a plastic baggy, cut the corner and apply it along the seams. Don uses a knife to smooth it out. They have seen people use a short cut by squirting a bead along the drawn-on part line and stick in plastic shims, without the fuss of cutting, taping and pins. It's a little sloppy, so they prefer to take the extra steps.

A third, fourth and fifth coat is applied over the shims and sculpture pieces. Then, they mix up more rubber with polyfil (to a thick icing consistency) and apply it with a plastic knife to areas that have any undercuts. A plaster mother mold will be applied to each mold. Those mother mold pieces have to come off easily, so there can't be undercuts that will hold the plaster.

A final sixth coat is applied, as sometimes the surface of the polyfil mix can be rough. The manufacturer recommends that you only start what you can finish that day. Don and Steve have finished 11 out of 17 pieces at this point. When they finish the rubber work, they will apply the plaster mother molds.

Sunday, February 7, 2010

Adding clay to "Light of Hope and Healing"


As I approach the finished surface of the sculpture, I want to have a smooth surface. I use La Beau Touche High-Melt clay, which at room temperature is relatively stiff. By warming the clay, it moves smoothly over the surface and fills in rough places.

Another way to smooth clay is to use a flexible metal tool. Here, I am smoothing the clay from the muscular portion of the leg down into the crease.

I am adding clay to the little boy.

This is the current progress on the woman. I need to fill in more around her hips and chest wall.

This is the progress on the little girl. I have blocked in her body and I am happy with her legs, but I need to define her arms and work some more on her head.

This is the overall sculpture at the present stage. The woman's legs need some more bulk, and the man's legs need to be slimmer.

We had several inches of snow this last week. I stopped on the drive between the house and studio to take this picture.

As you can see, the snow clung to everything - and it made for a very pretty scene. This is one of the places where I feed birds, which is at the back of the studio property. There is a stone bench under the tree on which I put the seed.

These are the biggest birds to eat at the seed table (which is just outside the studio). The turkey on the left is much more cautious than the others, and seemed to be aware of me. He soon moved out of view.

Here is another visitor to the seed table - an Opossum. I scatter seeds under the table, as well, so that critters who would have trouble climbing can have something to eat, too.

Sunday, January 31, 2010

Refining the clay


Using the point of a wooden skewer, I mark out the major muscle groups. I will define these areas with a rake tool.

I use a loop tool, called a rake, to go over the clay and make an even surface.

I remove the head of each sculpture, so that I can work on it separately. I have a floor flange, mounted on a board with a section of pipe, which the pipe of the head slips over. I use a laptop (shown) to display pictures of the models, for reference.

I have defined the torso of the man, and begun work on the torso of the woman.

Over the basic figure of the man, I apply clay in the muscle groups of the chest and abdomen.

I have defined the torsos of the man and woman and have added muscle mass to the man's legs.

I feed birds everyday. At the studio, I have 8 places where I put out sunflower seeds. These turkeys are the biggest birds coming in for snacks. It has just started to snow.

We had a fair amount of snow - 6". Here, a female Cardinal and a Red Belly Woodpecker are helping themselves to some sunflower seeds.

Saturday night, we had a freezing fog. The result is that everything has a coating of ice crystals. This is lower field in front of the house. It has flooded from recent rain.

The freezing fog left a heavy layer of ice crystals on these plants.

This is a closeup of ice crystals.