Monday, February 25, 2013

A new project is about to begin, Louisville, KY opens a new pedestrian bridge

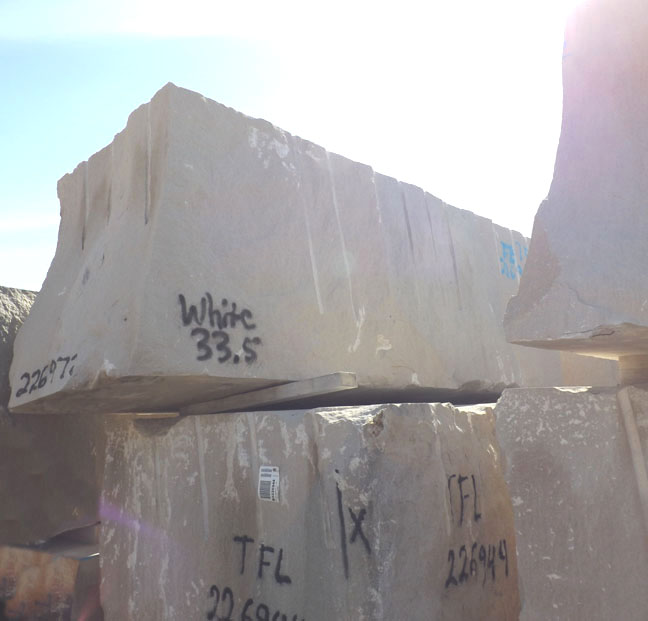
I just received a commission for a public sculpture.  The commissioning agency plans on announcing this and other sculptures it is acquiring in a few days, so I will wait to post photos of the models and name the organization.  The commission will be carved in limestone from multiple blocks.  Here are some photos of the quarry (Indiana Limestone Company, formally Victor Oolitic of Bloomington, Indiana.

 There are lots and lots of blocks in the quarry...
 ...acres of stone.  But finding the right size blocks can be difficult.  Fortunately, the company has a computer program listing stones by their length, depth and height so we could go right to the stones for the job.
Like this one...
 and this..
...and this one, Brent Blackwell paints my name on the rock.
 and this one too, a couple other besides.  I'll post pictures of the project in the next blog.
 Louisville Kentucky has refurbished the Big Four Railroad bridge into a pedestrian walkway.
There was a large crowd on the Saturday that I walked it.

Thursday, February 14, 2013

The Bright Lights Exhibition and creating a Veterinarian in water clay

New Albany Indiana's Arts Council has several exhibitions about sculptor Barney Bright (who created "The Search, a monumental sculpture at the New Albany Free Public Library) as well as those who worked with him.  I attended the opening of the "Bright Lights" exhibit which is at  Spring Street.  It is a group show of people who worked at Bright Foundry or merely had work cast there.  The show is a who's who of area sculptors as well as well known painters.
This painting is by Robert Jackson. He worked at Bright Foundry back in the 80s.  He has done a great deal of art in the city, working in various capacities including set painting for Actors Theatre of Louisville,KY.
This striking print is by Mary Lou Hess.  She was one of a group that acquired "The Search" for the Library in New Albany.
I begin work on the water clay version of a Veterinarian holding a puppy (the mother dog stands next to the doctor, watching). I begin by blocking in the clay using the smaller castilene model as a guide.
I use skewers to stabilize the heavy water clay.  Later I use a wire tool to cut open different areas of the sculpture and hollow it out.  I then stuff moistened paper towels into the cavity. This helps to lighten the sculpture so it doesn't slump.


I work up the features of the sculpture with loop tools and now refer to the original photo reference of the Veterinarian instead of using the smaller maquette.  I have worked up the puppy the doctor is holding and place it at the end of his arms.  I will then work the hands onto the puppy and doctors arms. Notice I use pillars of clay to support the arms.


The arms are a bit drier than the clay of the puppy  so I wrap them with damp towel paper to get them moister. I have added additional support under the pup as well.


I have removed the supports under the arms but the support under the puppy remains.  I will leave that until the clay is fairly dry. 


Sunday, February 10, 2013

Beth's sweet 16

My niece just turned 16 and so, family gathered for the party.  I this photo, from left to right - My Aunt Bunny, my sister Phyllis, my sister-in-law Denise, Beth's brother Joe and my brother Mark.
The house was festively decorated in pink for the occasion.  Beth's little brother Joe has just run through these pink streamers, too fast for the camera to record.

Everyone sings Happy Birthday to Beth. 
Beth watches as her older brother, Danny, cuts the cake.
Now the best part of the party - presents!
Beth's grandfather and I always have a session of "Dueling cameras" at family gatherings.
A pinata added to the festivities.  Beth takes a swing with a small baseball bat.
It took many hits (adults finally had to get involved) before the pinata was broken and candy spilled on the floor and the kids descended upon it.

Monday, January 28, 2013

Bright Lights exhibition I'm a finalist in Florida

 
I just delivered a couple of works to the Resch /Arts Council Gallery in New Albany, Indiana (my hometown). It is located on the second floor at 138 E. Spring St.  The opening will be 1-4  Saturday, February 9th. The show runs from February 1 - March 29th.
The exhibition is entitled "Bright Lights" and is comprised of various artists who worked with Barney Bright or had work cast at the foundry.  This piece, a mother gorilla and child is actually a maquette for a larger sculpture.  I is created from Castilene, a modeling material that Barney developed.  Castilene can be burned out of an investment or ceramic mold just like wax so a rubber mold is not necessary.  
The show runs concurrently with exhibitions about Barney's sculpture "The Search" located at the New Albany Free Public Library and an exhibition of his smaller works at The Arts Council of Southern Indiana at 820 East Market, New Albany.  Here is a link to information about the shows -

A variety of materials (wood and stone) will be on display....
...as well as bronzes - these are by Dave Lind....
....as well as plaster castings by Raymond Graf.
 I am a finalist for a $100,000.00 commission in Florida and have been working on a maquette for the past few weeks.  I had just finished the model and submitted the proposal to the committee and so I decided to treat myself and take a walk on the property below the house.  The property is bordered by a creek and periodically floods - the house is well out of the flood zone - thankfully. It has been pretty cold lately and the flood water froze, then the water levels fell.  The ice pictured here is actually held up by grass and weeds.
 This is a view across the ice, weeds and grass below, distant trees above.
 beneath the ice, looking at the sky....
The falling water left bits of ice in tree limbs.
An interesting pattern in the ice.

Monday, January 21, 2013

A Redo on Flight's patina and his departure to his new home, Enid and Boblockhart Shows

I decided to redo the patina on Flight.  Here he is with a more gold ferric on the body and nice green on the supports which I see as symbolizing courage.  Flight is sold and his new owner has referred to him as Icarus which I can see, particularly as he is now gold.  The gold would reference the Sun to which Icarus flew.  Perhaps I'll call the piece Dream of Icarus in which he imagines himself as the Sun. Flight is the first of a limited edition of 6.
I'd like to do the piece large for a public site, say about 12 feet tall. That would be interesting....
Flight will be travelling via UPS to his new home and care must be taken so that he arrives safely.  First bubblewrap is taped around him.
Then various types of foam are taped around with extra wrappings on face and hands.  He is then placed in his crate with additional packing so that he won't move during shipping.
The wooden crate is delivered to UPS.  I was on pins and needles until I heard that he had arrived safely at his new home. Thanks UPS!
A group of woman sculptors has a show going on at the Cressman Center on Main St. in Louisville, KY. The name of the group is Enid for the sculptress Enid Yandell who lived from 1870 -1934 and created the Daniel Boone statue which stands at the entrance to Cherokee Park.  This lovely ceramic piece is by Mary Dennis Kannapel.
This wonderful torso composed of seed pods is by Suzanne Mitchell.
Ewing Fahey poses with one of her clever bone assemblages.
Bob Lockhart recently had a show at Bellermine College.  He creates these wonderfully rendered images that are sweetly sinister. They are reminiscent of Grimms Fairy Tales mix of the fanciful and macabre.
Bob Lockhart reflected in one of his works.

Friday, January 18, 2013

Carving a face using a model

I will be using a model to carve a face in this piece of limestone.  First I have to make the bottom flat.
I use the 4" angle grinder with a diamond wheel to make a flat surface at the bottom of the stone.  The plaster model I will be using is on the left side of the photo.  I will be working on a 1-1 scale (same size) using calipers and a ruler to check volumes.
By taking careful measurements I mark the areas I can safely remove from the stone.  I always cut a little wide of the mark, I can always come back and remove more stone, I can't add it back on. I am putting the face in the bottom of the stone as it is sufficiently thick there to accomodate the face, but narrows above it.  Time will tell what I will do with that area.
The first cuts remove the area in front of the forehead.

I draw a tighter profile on the rock.


I cut wide on either side of the nose and cutting the basic planes of the face based on measurements I take from the model - incidentally, this plaster casting is from the bronze sculpture entitled "Light of Hope and Healing" which I created for the Hux Cancer Center in Terre Haute, Indiana.
I begin smoothing the planes and start defining features.  The face is larger than it should be as I have cut wide on all measurements- Nose too big, chin too strong, etc.
I have given an indication of where the features are.  I use a 4 inch grinder with a masonry blade to define most large areas and establish planes.  The diamond blade is too aggressive for this work and leaves a rough scalloped surface.  A pistol grip sander with 36 grit paper would work as well.  A die grinder with a mounted stone is used for smaller areas around eyes and mouth.
I use a caliper to check the size of the chin on the model and then use them on the stone.  I shade in the area that is too heavy with black china marker. The china marker visually removes the stone so I check to see if I want to remove all that stone.  This is a photo of measuring again,after I have marked what needs to be removed, making sure I have the measurement correct!
With careful measurements the face comes into shape.
Now I have to figure out  what to do with all that stone on top of the head. Swirling hair it must be.  I decide it is a woman underwater, her hair flowing around her head.
I further define the features of the face while I try to figure out what to do with that hair.
I use use an angle grinder to create the main movements through the hair and a die grinder with a mounted stone to carve out deep areas.  Small burrs are used on the die grinder to define eyes nose and mouth.
She's getting there though she still needs refinement....I'm not trying to make a duplicate of the plaster original, it's just a good starting place.

Inside I mark the areas I want to define with black china marker and put her aside.