Showing posts with label Kosair Childrens hospital. Show all posts

Sunday, March 6, 2011

Work continues, trolley hop and bear approval


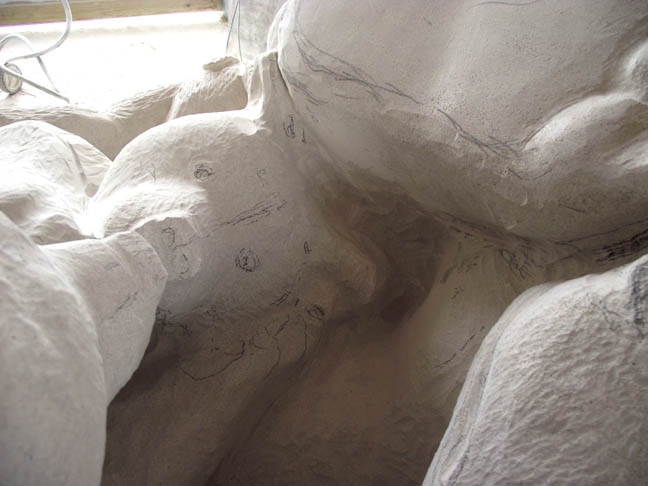
I cut the face from the side of the sculpture so that I can begin carving in the facial features.

I keep the face to check against to make sure the eyes, mouth, etc are in the right position.
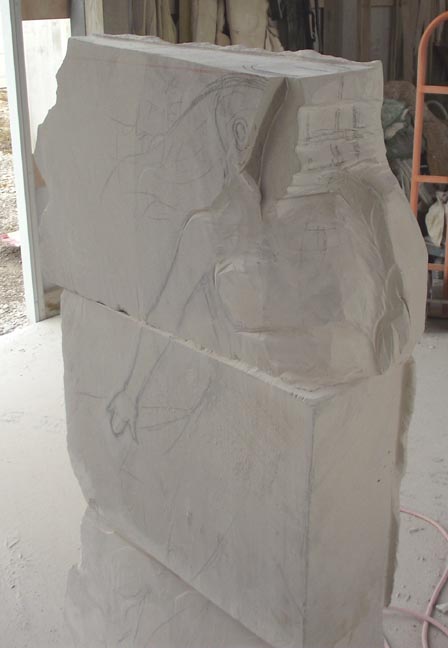
I use a china marker to sketch the arm, hair,waist and skirt.

I begin forming the body with a 4" angle grinder. I cut around the arm as well. I start to lightly define the leg.

Switching off the stacked piece to Ophelia, I trimed off the edges of the stone using an angle grinder. I used a hammer to tap off the sections of stone to be removed.

We attended the opening of Chris Mozier's one man show at the downtown Bristol. Here are some of the other people attending. Excellent work with a mix of subtle colors with strong accents and interesting textures. Don and I were impressed.

Chris's show was during the trolley hop (first Friday) so we made the most of our Lousiville visit and went to several galleries - Zephyr, Pyro and we also ventured into Tim Faulkner Gallery- first time for us. There is an interesting group of work that can be discovered by exploring through various rooms.

We parked behind this facade of a building. I thought the light made for an interesting shot.

The man and woman who commissioned the bear came out to see and approve it today. They were very happy with the piece. I didn't think of snapping a picture while they were looking at the bear but I got this pic of their son, daughter and friends on our caboose!

Seldom do you see the red belly of the Red Bellied Woodpecker. Here it is...

Wednesday, February 2, 2011

Finishing touches on the bears.


For the finish work, I employ halogen worklights. One pair is up on scaffolding, the other on the ground, to help me see areas that need just a bit more work.

I am nearly finished with this area, just a bit more cleanup necessary.

I use a china marker (basically a black crayon) to mark where I need hairs, and notes about what needs to be done in an area. The note says "edge" and has arrows pointing to the nose indicating the edge needs to be more rounded. Crosshatching means an area is too high.

I have marked where I need additional hairs with the black crayon and have further deepened the crease under the mother's chin and neck.

This is a small flat end burr that I use to create a deep shadow under the mother's chin and neck.

I use a point burr to add fur texture in creases.

I also use it to clean up areas around the eye.

It was a foggy day at the studio....

I feed birds, and today while I was putting out seed, I came upon this possum looking for snacks. I stayed very still - they have terrible eyesight -and watched him as he foraged for food. He would walk along, then suddenly turn to root around in the leaves and eat whatever morsel he found. He came very close to me (just a few yards) never realizing I was there.

And then, he wandered away.

Wednesday, January 12, 2011

fur and more fur - detailing the cubs

I am carving the claws of the cub that is being cleaned by its mother. This is a ball diamond burr with 1/4" shank.

These are some of the diamond burrs that I use for carving the bear's claws, nose, fur, etc. The ball is very effective for removing stone when I start to define an area. I start with the largest burr to begin carving the form, and then work down to smaller and narrower burrs. The two burrs on the right are used more for fur, the point for creases and to define eyes, nose, etc. When carving a form it is best to think about carving around the form instead of carving on the form. If that makes sense. I get diamond burrs from www.lopacki.com

This is the hair inside the mother's right rear leg. The interior areas of the sculpture are some of the most difficult, as I have to use a large die grinder which is slow and the area needs to be blown out periodically as the dust loads up pretty quick.

This is the intersection of the cub's foot, mother's left elbow and her rear leg. I have just begun to define it - it will need a little deeper carving to get the definition that I want.

I have carved out the area between the cub's upper arm and the mother's back foot and have applied a fur pattern. Also, I have opened the area between the cub's head and mother's back foot and I have blocked out the mother's claws.

The bears, from the right side.

This is the left side of the bears. I have recarved the mother's shoulder and have reworked the mother's fur texture on this side, but I will go back and add more depth with deeper carving. The fur needs several passes to get the look that I'm after.
Juanita was in my last post and I thought I'd show you another of my donkeys, Ed. He has had a treat and is begging for another. Can't you tell he's saying "Please?"

A Doe looks at me while her fawn eats cracked corn. We started feeding deer accidentally. The store where we buy sweet feed for the donkeys loaded up a bag of cracked corn by mistake. Corn is too rich for the donkeys to eat, so we started feeding the deer and once you start, it's hard to stop.

This is a snow flake on the car window surrounded by frost crystals .

Sunday, November 21, 2010

Finishing touches on the Bears and sky high photo

While I am working on the hair pattern, I check both sides to make sure the pattern is somewhat consistant. I am working in various areas, refining the cub's feet, opening up the areas between the cub's legs and the mother's, as well as refining her face, nose and eyes.
This is the mother's right forearm. I have used a diamond wheel tool on the fur at the bottom of the photo. The testure at the top is from a masonry wheel on an angle grinder. You can see how much more dimension is achieved by using the diamond wheel. It is a lot more work, though. Also, you need a good strong light from the side in order to really see what you're doing.
This is a flared flat ended diamond tool on a small die-grinder for putting hairs on the cub's foot. I do a lot of shaping with this tool, as I put on the hair.
I use the same tool for cutting in the nose of this cub.
It's also handy for setting the eye back into the skull.
I use a larger die-grinder to open the area between the mother bear's leg and the cub's leg. I work the area from both sides until I have it opened.
How did I manage to get a photo of the property from so high up? I'll never tell!
This is some insect work going on here - this is from earlier in the year, just ran across it and thought it was interesting.

Sunday, October 24, 2010

Finding the cubs, a show at Pyro

I am using a die-grinder to shape the cub's head. I am also using it to remove stone under the head.
I am opening the area around the ear and down the mother's leg. I am careful not to create a pocket that will hold water.

The cub is still blocky in feeling; I will refine it as I apply fur texture.


I am applying fur texture to the mother bear's leg. First, I made a pattern with a masonry wheel on a 4" grinder (right side of picture). Then, I come back with this little die grinder and make random, somewhat deep, cuts with this diamond wheel tool. I, then, use this same tool to make individual hairs, varying the pressure as I go to create dimension to the fur.

Here is the mother's leg with fur texture. I will move the sculpture outside before I am finished, to make sure everything looks the way I want it.
Al Nelson and Bob Lockhart have work included in a show at Pyro Gallery in Louisville, Ky. This is Don looking at a work in wood by Bob Lockhart.
This is a sculpture by Al Nelson. The center is stone and can be easily spun around because....

It has an hourglass inside! Really ingenious.
A woman admires another sculpture of Al's, as seen through Bob Lockharts sculpture.
A screech owl watched us, as we drove by.

Wednesday, September 15, 2010

Bear Modifications and the finishing of the molds

I wanted the hips to be lifting more, to give the movent that I wanted. She is using her back foot to restrain her cub that she is cleaning. I felt that she looked a little heavy at the base, so I colored in the area beneath her shoulders and beneath her hips with lumber crayon. After stepping back and taking pictures, thinking about it, I decided to remove that area.
I used a 4 inch angle grinder and a hammer to remove the stone.

Here she is with the stone removed. I am much happier with the form now.

I have a similar view in the previous post. Here, I have removed the stone between the mother's back paws and have refined the cub and the mother's head. I have carved the mother's left shoulder much farther in, where her left front leg crosses her chest to hold the cub that she is cleaning.
Meanwhile, Don is applying the plaster mother mold to the last of the molds. Soon, they will be packed and shipped to the foundry.
After a thin first layer of plaster is applied, a layer of hemp saturated in plaster is applied to the mold surface. This gives the plaster a great deal of strength.
Additional layers of plaster are added and the form smoothed.
When the plaster is thoroughly dry, it is pried open. The plaster mother mold pieces are carefully set to the side, leaving the rubber coated piece.
The rubber mold is then opened by gently separating a layer of rubber on one side of the shim. An exacto knife is used to cut the little bit of rubber, below the shim, which were the first 2 layers that were applied over the clay.
When that has been done all the way around the piece, you can lift the rubber mold pieces from the clay.

The plaster and rubber molds are then reassembled (without the clay), and labeled. They are now ready to be packed and shipped to the foundry.
Bird n Claws - I thought it was interesting that the branches resemble bird's feet.